5
4
Product may vary slightly from what is illustrated.
How to Use
This product is for household use only.
GETTING STARTED
• Removeallpackingmaterialand,ifapplicable,anystickersfromtheproduct;removeand
save literature.
• Pleasegotowww.prodprotect.com/applicatoregisteryourwarranty;foradditional
information go to www.georgeforemancooking.com.
• Washallremovablepartsand/oraccessoriesasinstructedinCAREANDCLEANING.
• Wipegrillplateswithadampclothorspongetoremoveanydust.Wipedrywithasoftcloth
or paper towel.
• Selectadry,levellocationwhereyourgrillwillbeused,leavingenoughspacebetweenthe
back of grill and wall to allow heat to flow without damage to cabinets and walls.
DRIP TRAY
Place drip tray under front sloped section of grill.
PREHEATING THE GRILL
1. Close cover on grill.
2. Unwind cord and plug into standard electrical outlet.
3. PresstheOn/Off(I/O)switchonthebackofthegrilltotheON(I)position.Thepreheat
indicator light turns on to show the grill is heating.
4. Set the variable temperature control knob on the top of the grill to the desired setting (see
GRILLINGCHARTforsuggestedtemperatures).
5. Allow the grill to preheat (approximately 5 minutes) before grilling. When the selected
temperature is reached, the preheat indicator light will go out.
Note: The preheat indicator light will turn on and off during cooking to indicate your desired
temperature is being maintained.
GRILLING
1. Using a pot holder, carefully open the preheated grill.
2. Before first use, lightly oil grill plates, if desired.
Note: Aerosol cooking spray should not be used on nonstick surface. Chemicals that allow
spray to come out of can build up on surface of grill plates and reduce their efficiency.
3. Carefully place foods to be cooked on lower grill plate. This grill accommodates up
to 6 servings.
Note: Do not overload grill.
4. Close the cover and allow food to cook for the selected time. If desired, use a kitchen timer.
Note: UsesuggestedcookingtimesfoundintheGRILLINGCHARTonpages6,7and8.
Important: Do not leave the appliance unattended during use.
5. Light pressure can be used on the handle to press and heat food to your liking.
Important: Do not use heavy pressure on the lid of the grill at any time.
6. After selected time, the food should be done. If you would prefer longer cooking,
simply follow the steps beginning at step 4.
7. Once cooking is complete, carefully open the grill cover using a pot holder.
8. Remove cooked food using plastic spatula provided.
Note: Always use silicone, heatproof plastic or wood utensils to avoid scratching nonstick
surfaceofgrillplates.Neverusemetalspatulas,skewers,tongs,forksorknives.
9. Whenfinishedcooking,pressOn/Off(I/O)andunplugtheappliance.
Important: Heat will continue to be ON until the On/Off (I/O) switch is pressed or the
appliance is unplugged.
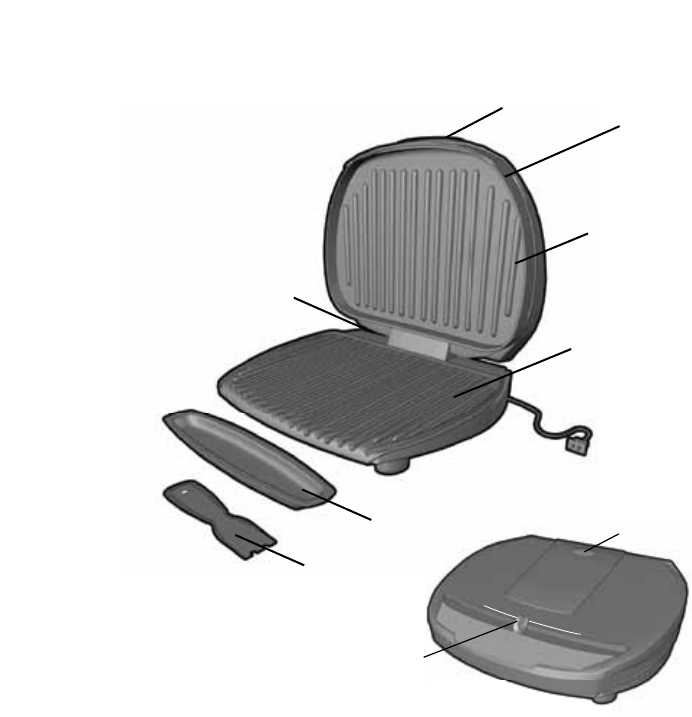
1. Lid handle
2.Grilllid
3.Grillplate(upper)
4.Grillplate(lower)
5.On/Offswitch(notshown)
† 6. Driptray(Part#GR100V-01)
† 7. Spatula(Part#GR100V-02)
8. Preheat indicator light
9. Variabletemperaturecontrol
Note: †indicatesconsumerreplaceable/removableparts
4
3
2
6
1
7
5
MIN
MAX
8
9


 (2 pages)
 Manymanuals.com
 Manymanuals.de
 Manymanuals.fr
 Manymanuals.it
 Manymanuals.pl
 Manymanuals.cz
 Manymanuals.es
 Manymanuals-pt.com
Comments to this Manuals